Once the LINAC finish delivering the monitor units for the dose rate measurement, the overlay, CAX Check Preparation, appears and shows the CAX check measurement settings.
Overlay, CAX Check Preparation, with CAX check measurement settings
Set up the devices as described in the overlay and turn on the beam, the measurements will start.
Important: More than minimum required monitor units may be needed
Minimum required monitor units in the overlays, CAX Check Preparation and Waiting for Beams, are estimated using the current measured dose rate. Please observe whether it is enough for the measurement. It may need more monitor units due to deviations in the LINAC dose rate delivery and the phantom settings.
Blue Phantom2 and SMARTSCAN phantom
The CAX check is carried out in the same way as the CAX Measurement wizard in the myQA Accept core (see more information in CAX Measurement): Inline and crossline profiles at two different depths, 25 mm and 125 mm for photons; for electron, it is performed at a depth of 25 mm.
Blue PhantomCOMPACT
Figure 1. BPCOMPACT - servo coordinate system. In this example, the phantom x-axis co-inside the inline axis.
In the Blue PhantomCOMPACT, the chamber moves along the x and z-rails. Depending on the phantom orientation in the measurement setup, the CAX check is applied to inline or crossline along the detector moving axis at 25 mm and 125 mm depths for photons; 25mm depth only for electrons.
FFF beams
Starting from myQA Accept Version 8.5, the SMARTSCAN application supports FFF beams for the CAX measurements in baseline measurements. The CAX check analysis applies the algorithm based on the inflection points described in Section 8.1.5, myQA Accept Reference Guide.
If more than one FFF energy is present, the closest energy to the mean energy is selected for the CAX measurements.
If the radiation devices and/or the queue to be measured contained a mix of FF and FFF energies, the queue optimization is carried out for FF energies first and then FFF energies:
- First, the FF energies are optimized and then CAX measurement is performed.
- Secondly, the FFF energies are optimized and then CAX measurement is performed.
All deviations are within the tolerances
If the CAX check is passed, a green checkmark appears in the Summary for CAX check:
You can continue to the next Measurement page or run any step of the baseline measurements by clicking the corresponding Run button.
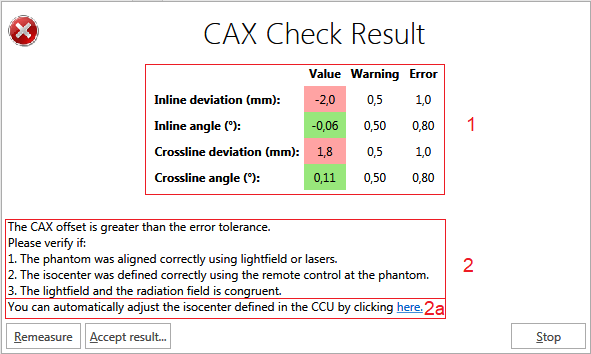
If the CAX check results are out of tolerance, an overlay is opened. It displays the actual measured the inline/crossline shifts and angle deviations and tolerances (1), and suggestions for the user to correct the alignment (2).
CAX check is failed with only out-of-tolerance shifts (SMARTSACN or Blue Phantom2). 
Only shift deviations are out of tolerances
If a shift or both shifts are out of tolerance (but the rotations are within the tolerances), options are:
-
Correct the isocenter in the CCU to compensate the shift by click the link, “here” (2a)
-
Adjust the phantom and then repeat the CAX check procedure by clicking Remeasure.
-
Accept the miss-alignment and mark CAX check as a success by clicking Accept result.
At least one angle deviation is out of tolerances
If at least one angle is out of tolerance, options are:
-
Adjust the phantom and then repeat the CAX check procedure by clicking Remeasure.
-
Accept the miss-alignment and mark CAX check as a success by clicking Accept result.
Example 2: CAX check is failed with at least one angle deviation is out-off-tolerance (SMARTSACN or Blue Phantom2).
Note that for Blue PhantomCOMPACT, the result displays the shift deviations on crossline and inline axes since only one direction of CAX measurement is necessary. If the deviations are out of tolerance the options for correction are the same as for a 3D phantom in the case, only shift deviations are out of tolerances, described above.
Button commands in the overlay, CAX Check Result
Remeasure: re-starts the CAX check measurements and closes the overlay.
Stop: closes the overlay. A warning sign appears next to CAX check under Summery
Accept result: a popup dialog appears:
If Yes is clicked, the misalignment is accepted and the CAX check is sets as success. However, the misalignment is reported in the summary.
Note:
Reset of isocenter with the hand control of the CCU or Positioning panel in the Controller view (Connection and Setup Workflow) will not be reflected in the CAX status display in the Baseline Measurements page and will display in the CAX Check Result dialog. The new isocenter is only taken into account after re-doing the CAX measurement.