Sphinx V1
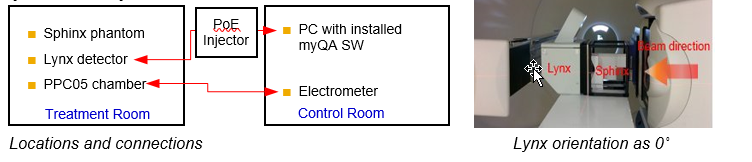
Locations and connections Lynx orientation as 0˚
Device connection
- Plug the connector with a round metal cover of the 30 m network cable to the Lynx and the other end of the cable to the Data Out port of the Injector.
- Plug one end of the 3 m network cable to the Data In port of the injector and the other end to the PC
- Connect the injector to a power supply with the provided power cord.
Setting up the Sphinx V1 system
- Prepare the Sphinx phantom:
- Mount the positioning bar at one of the five mounting positions on the bottom side.
- Install the PPC05 chamber if needed.
- Insert the central fiducial,
- Insert the desired insert blocks.
- Insert the slot fillers to the unused slots
- On the patient coach, place the index bar of the treatment system on the position approximately where the phantom should be located.
- Place the Sphinx phantom next to the index bar.
- Attach the Lynx to the phantom as that it is at the desired orientation [Sec. 9.2.1, Vol.3]
- Connect the PPC05 to the electrometer.
- Connect the Lynx to the PC (see the previous section).
- Inside the blocks, there are four fiducials. Take an X-ray image and save this reference image. In the setup of following days, compare the positions of the four fiducials with those in the reference image. If there is difference, move the PPS so that the position of the phantom is the same everyday.
- Verify that the laser matches to markers of the phantom and scintillator.
Sphinx Compact (v2)
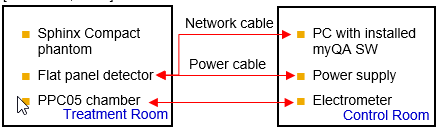
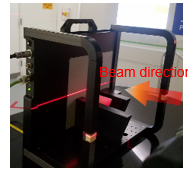
Locations and connections Sphinx Compact at orientation 90˚
Device connection
- Connect the power supply to the detector power input.
- Connect the flat panel to the PC.
- Connect the power supply to the mains power and switch it on.
Setting up the Devices
- Attach the alignment bar on the Sphinx compact housing.
- Place the indexing bar on the couch. Note down the position for future daily QAs.
- Place the Sphinx Compact on the treatment couch such the two pins on the indexing bar insert into the holes in the alignment bar.
- Move the couch to align the room laser to the marks on the Sphinx Compact frame and the central fiducial on the carbon rod.
For the first time positioning, the position of the fiducial may need to be adjusted to match the laser markers.
- Save the table position for future daily QAs.
Set up the PT measurement devices in the myQA SW
[Sec. 6.4.3, Vol.1]
Precondition: (Lynx detector only) the detector driver has been installed and NetConfigLynx2D.exe has been run to establish the connection with the detector.
- In Equipment Setup page, under a clinic/department/room, click New Detector in the ribbon.
- Select Lynx or Sphinx Compact in the Type combo box.
- Enter a name for the detector.
- Click Add files. Browse and load the available detector calibration files.
- Select the detector calibration files to be used in the measurements.
- Click the Test connection button
- Click Save.