Question
Why are my Blue Phantom mechanics oscillating?
Answer
There are several reasons the mechanics could begin to oscillate or otherwise move on their own with the Blue Phantom 2, Blue Phantom Helix and the Blue Phantom Compact.
The following are the most likely causes in order of popularity:
A loose or damaged Drive Control Cable
The drive control cable is the most likely cause for mechanical oscillation. A thorough inspection of the cable should be performed. Focus should be exercised with the pins on the cable end that connect to the Common Control Unit (CCU) as well as the pins on the Phantom's Connector Box. The pins should be straight and not pushed into the connector. If the pins are found to be damaged, a replacement should be ordered through our Service Department.
Lastly, ensure the connectors are seated fully on both ends, using the thumbscrews only to prevent the cable from becoming disconnected. Over tightening these screws can cause them to break off in the receiving nut.
One or more of the axes is at its extreme limit
If any of the axes are at the very end of their travel, it can cause the mechanics to function incorrectly To resolve this, power the system up and gently move the suspected axis a few centimeters away from the end of the rail by hand.
*This can only be done within the first few moments of the boot-up process. There should be very little resistance.*
Once finished, power cycle the system.
Incorrect Zero Position with one or more axes
Various events can cause the mechanics to have an incorrect Zero Position. The zero position is important as the scan range is based off of this value. To verify/correct this
Step 1
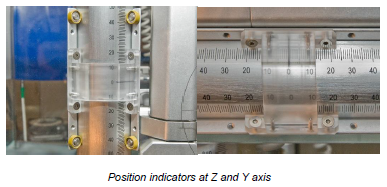
As a first step, move all axis of the phantom as close as possible to the zero position of the metal rulers.
Step 2
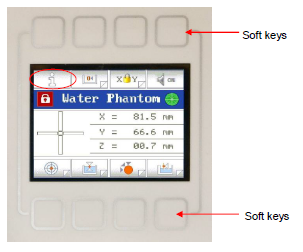
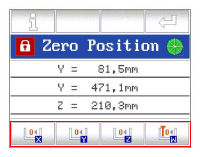
Push the second (from the left) softkey button on the remote control to open the Zero Position menu.
Step 3
Press all three icons at the remote control to set a new zero position for the sensors. The positions displayed on the remote control screen will change accordingly from the previous position value to zero. The position value of the TMR probe (button W) should be ignored at this point.
Step 4
When it is impossible to reach the real zero position of the axis at the first time, repeat the procedure and move the mechanics to the real zero position indicated at the rulers.
Step 5
Verify that the positions of the position markers at the Blue Phantom2 axis are the same as the positions displayed on the remote control.
Step 6
Finally, move each axis with the remote control the end positions in both directions. If the zeroing has been performed correctly, the slider should stop automatically before it moves against the bumper at the end of the axis. Should the slider move against the block (visual or by sound), the zero position needs to be reviewed. The margins / tolerances for the zero position are very small and the position indicator at the axis should match exactly to the zero markers at the ruler. Repeat the zeroing procedure and test on demand.
Step 7
After this final review, leave the zeroing menu at the remote control by pressing the return button in the top right of the Remote Control.
One or more failed i-buttons
Each axis on the Phantom has a i-button, which is a very small electronic circuit board. If these become damaged, or lose their programming it can cause the mechanics to oscillate. If the previous steps did not resolve the issue, a repair will be needed.